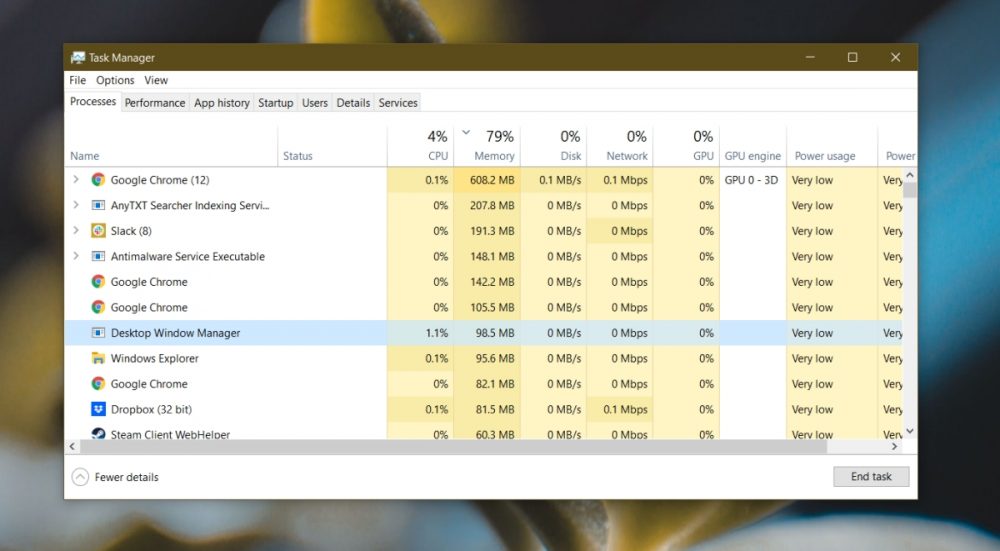
Well, Desktop Window Manager (dwm.exe) is a window manager in charge of the graphics effects in Windows 10 and 11, such as Flip3D and transparent windows, as well as live taskbar thumbnails. It’s a normal process that you’ll see operating most of the time smoothly in Windows Task Manager. However, this can occasionally go awry and begin consuming too many resources, resulting in black screen errors or software crashes.
A similar issue occurs with Windows 11 sometimes, and having your PC lag due to service may cause a lot of irritation, especially for people who work from home and rely on their computers to run properly. It’s a major issue, and while no official response has been provided, another user claims that a recent Intel driver bug caused it.
Why Does Desktop Window Manager High CPU Usage Occur?
This issue exists in all versions of Windows, and many people have experienced Dwm.exe Windows 11 issues on their computers. Memory and CPU issues are included. Speaking of which, several people have reported CPU usage above 100% while nothing is running. If this occurs, you have a background process using your resources. Unfortunately, this is a widespread issue, with many users reporting high CPU usage from explorer.exe on their PCs. Fortunately, there are solutions to this problem.
How To Easily Fix Desktop Window Manager High Memory Use On Windows 10 & 11?
Windows 10
Restart File Explorer From Task Manager
1 – Right-click a free space on your taskbar and select Task Manager.
2 – Click the Windows Explorer process and press the Restart button in the lower right corner of your screen.
This is merely a fix suggested by one of the customers who had the same issue, but if it worked for him, it’s worth a go.
Intel Graphics Driver Can Be Updated Or Rolled Back
1 – First, right-click the Start button and select Device Manager from the menu that appears.
2 – Expand the Display adapter, right-click on your graphics driver, and choose Update from the menu.
3 – Select the top option, Search for drivers automatically.
4 – If you get a message, The optimal drivers for your device are already loaded; however, you may check the manufacturer’s website to see if there is a new one for your GPU.
5 – You may also go to the Windows Updates area by clicking on the Search for updated drivers on the Windows Update option.
6 – Select Optional updates and search for any driver updates.
We must emphasize the need to exercise extreme caution while installing drivers manually. If you install an incorrect version, you may have additional glitches, resolution issues, and other errors such as frequent BSODs.
Run Full System Scan
1 – Go to Start and click Settings.
2 – Navigate to the Update & Security section.
3 – Navigate to the Windows Security tab and click Virus and Threat Protection.
4 – Scroll to the bottom and select Scan Options.
5 – Click the Scan Now button after selecting Microsoft Defender Offline Scan.
6 – Ensure that you have saved your work and that any open programs are closed.
7 – To restart your computer, click the Scan button.
We recommend using a third-party Windows-compatible antivirus if you want more scanning choices and more accurate findings.
While the built-in utility is dependable, third-party solutions provide extra capabilities and detecting technologies, ensuring your system is secure on all fronts.
Multi-layered protection is typically used in conjunction with online security utilities such as VPNs and anti-tracking software, as well as camera protection, payment security, and other features.
Windows 11
Update Graphics Driver
1 – Press the Win + X keys together and select Device Manager.
2 – Extend the Display Adapters section.
3 – Select Update driver from the context menu of your GPU.
4 – Select Search for drivers automatically.
5 – Wait for the process to finish.
If the automatic driver search yields no results, you might attempt a driver updater software like DriverFix.
Modify Visual Effects Options
1 – On your desktop, right-click This PC and select Properties.
2 – Navigate to Advanced system settings.
3 – Select Performance Settings from the Advanced menu.
4 – Go to the Visual Effects menu and select Custom.
5 – Deactivate any undesirable visual effects.
Windows will shut down and run an offline scan. When finished, the computer will restart automatically. But, first, check if the Desktop Window Manager is still using too many resources.
The Bottom Line:
Hopefully, these techniques will allow you to fix the Desktop Window Manager high memory issue. If you have other possible alternatives, please put them in the comments area so everyone can benefit.
