How to Change Your Android Autofill and Password Manager? Tired of typing in passwords every time you log in, or do you keep forgetting your passwords? Don’t worry, Android’s one great feature will take care of you. With your Android’s default autofill settings, you can choose to save your usernames, passwords, etc. By default, Android fills in your usernames and passwords for you using Google, but you can use any service you want. Autofill and a password manager can help people who have trouble remembering their usernames and passwords. It’s very helpful because you can also use it to check out if you’re on a phishing site. How? Well, the username or password won’t be filled in automatically if you aren’t on the original site. If the user’s credentials don’t get filled in automatically, they can check to see if they are on the original website.
Autofill not only works as a verification service, but it also makes it easier to search a website and log in in just a few seconds without having to worry about remembering passwords. If you enter your credentials manually, on the other hand, it will take a bit of time, and if you tend to forget them, it’s a race to infinity.
How does Android Autofill Work?
When you enter your login information for the first time, that information is saved (with your permission) on your device. After checking the Domain name, Protocol used by the website (http/https), Element IDs and names, and Form attributes, the data is pre-filled.
If the above attributes don’t match, the data is not pre-filled.
Autofill can be two types:
Automatic Autofill: In this kind of Autofill, usernames and passwords are filled in automatically without the user having to do anything.
Manual Autofill: In this case, the user has to do something. It asks for permission before it fills in your usernames or passwords automatically.
Note: You can change some settings to make Autofill work on both Android and Windows/Mac. Find out more by reading on.
Advantages of Autofill and password manager
The bad thing about autofill is that because it fills in your passwords every time, you might forget them. So, you only use autofill when you need to and for passwords that are long or hard to guess.
Here are some Android password managers that you can use:
- Enpass Password Manager has been downloaded 500,000 times and works on many different platforms.
- Blackberry Password Keeper has been downloaded 1 million times, but it is only free for Blackberry devices. Other devices get a free trial for 30 days.
- LastPass Password Manager has been downloaded 10 million times and works on all kinds of platforms.
- 5 Million People Have Used Dashlane Password Manager. Minimalistic UI.
- 1password-Password Manager has been downloaded 1 million times and works on many different platforms.
How to Change Your Android Autofill and Password Manager?
Follow these steps if you want to change the Autofill and password manager from Google to another service:
- Unlock your phone, then tap the Settings app.
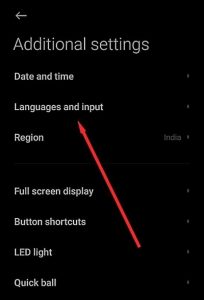
- Now, scroll down and tap System > Additional settings > Language & Input.

- Tap on More settings to make the section bigger, then tap on Autofill service.
- Tap Autofill service once more.
- If you don’t see any Autofill apps, the default service, which is Google, will show up.
You can also add more. - Tap “Add service” now.
- You must select a password manager, and then Google will prompt you to confirm that you trust the App. Tap OK.
- Restart your Device to save the changes.
How to Manage Google Autofill Settings?
If you make Google Autofill your default password manager, you can customise how it works. Follow these steps if you use Google’s password manager and want to customise how it works for you:
- Unlock your phone, and then tap the Settings app.
- Scroll down to Google settings.
- Tap on Auto-fill.
- Again tap on Auto-fill with Google.
- Here, you can customise your personal information, payment methods, addresses, and passwords. You can customise the information to meet your needs.
- Restart your Mobile device.
How to Delete Google Autofill Data?
Google Autofill is easy to turn off if you don’t want to use it. Or, if you only want to delete certain pieces of information, follow these steps:
- Unlock your phone, and then tap the Settings app.
- Scroll down to Google settings.
- Tap “Auto-fill.”
- Tap Auto-fill with Google once more.
- Tap on Addresses, and make the changes by clicking on the pencil icon. Confirm out the changes.
- Tap Payment Methods. Make changes by tapping the Remove, Edit, or Add Payment Method option. Confirm out the changes.
- Tap on Passwords, and then make changes by clicking on the site whose password you want to change or remove. Confirm out the changes.
When you’re done making changes, restart your Mobile device.
For safety, you can repeat the steps above to see if the information has been removed.
Wrap Up
Both good and bad advantages can be said about Android Autofill. You are the one who needs to be careful before going to a sketchy site. If you have any questions about the article, please write them down in the comments. Tell us which password manager or Autofill service you use, and that’s it.
If you have any thoughts on “How to Change Your Android Autofill and Password Manager? “, feel free to leave them in the comment box below. Also, please follow our DigitBin channel on YouTube to get video tutorials. Cheers!